
A cheese cave in Minecraft might sound like a niche term, but if you’ve played long enough, you’ve probably stumbled into one without realizing it, or wished you had. It’s the kind of structure that separates organized players from those with random chests scattered across their base. Whether you’re running a vanilla survival world or managing an elaborate creative project, a cheese cave solves one of Minecraft’s eternal problems: where do you store everything?
This guide covers everything from the basics of what a cheese cave is to advanced redstone integration and display systems. If you’re looking to maximize your storage efficiency, keep your base aesthetically clean, and actually remember where you put your diamonds, this is the strategy you need.
Table of Contents
ToggleKey Takeaways
- A cheese cave in Minecraft is a dedicated underground storage chamber that centralizes all your valuable items, food, and crafting materials in one organized location, solving the eternal problem of scattered chest management.
- Position your cheese cave between Y-level 0 and -64 (or Y-level 5-15 on older versions) with at least 50 blocks of horizontal distance from your main base to ensure both accessibility and security.
- Organize your cheese cave using a clear system before placing storage blocks—whether by resource type, rarity, activity, or project—and always label everything with item frames or signs to prevent hours of searching.
- Use shulker boxes as your primary storage solution since they stack, are portable, and hold full stacks, ideally color-coded and named with dye to identify contents at a glance.
- Implement advanced redstone features like automatic sorting systems and hopper integration to transform your cheese cave from static storage into a dynamic logistics hub that saves time on multiplayer servers.
- Start small with a 20×20 chamber if you’re new to the concept, then scale up as you understand your playstyle—a well-organized cheese cave becomes an essential infrastructure upgrade that extends playtime by reducing time spent searching for items.
What Is A Cheese Cave In Minecraft?
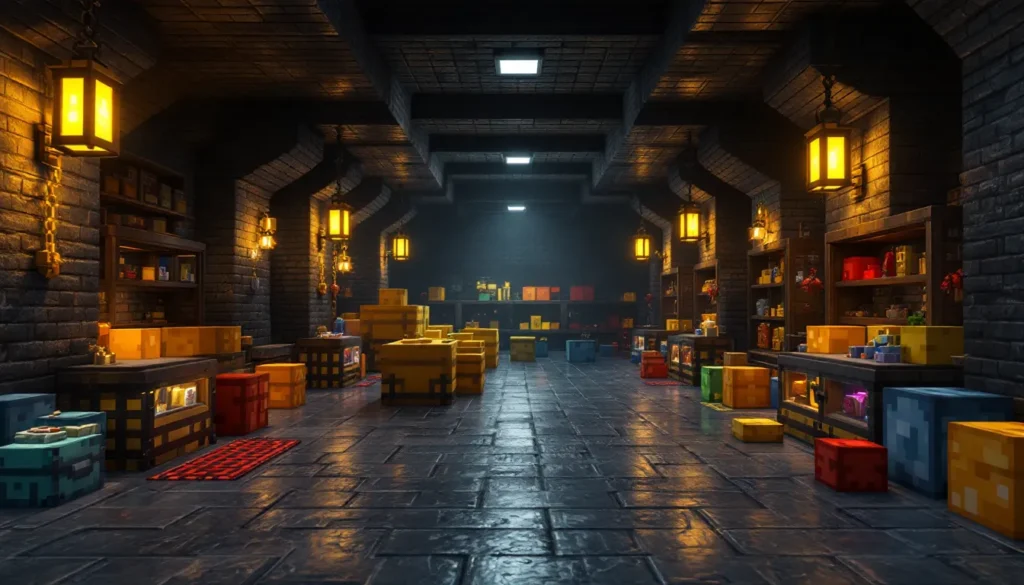
A cheese cave is a dedicated underground storage chamber built specifically to house all your valuable items, food supplies, and crafting materials in one organized location. The name comes from the Swiss cheese-like appearance that forms when you carve out a large cavern and fill it with storage blocks, chests, barrels, shulker boxes, and other container types create that pockmarked look.
It’s essentially a centralized bank for your base. Instead of keeping chests in your living quarters, workshop, or scattered mining operation, everything funnels into this single purpose-built chamber. Think of it as the inventory management system that vanilla Minecraft never officially gave you.
The beauty of a cheese cave lies in its simplicity and scalability. Whether you’re running a small single-player world or managing resources for a multiplayer server, the concept remains the same: dig deep, build big, organize ruthlessly. Most experienced players size their cheese cave based on how far they plan to play, casual players might build a modest 20×20 chamber, while veterans construct sprawling underground complexes that could rival medieval vaults.
Why Build A Cheese Cave?
Food Storage And Management
Food management in survival Minecraft gets chaotic fast. You’re running between your farm, your base, your mining operations, and suddenly you’ve got 27 stacks of cooked beef with no system. A dedicated food storage section in your cheese cave prevents this mess.
Store all your food types, cooked meat, bread, golden apples, suspicious stew, in designated areas. Use item frames or signs to label each storage section. This saves precious inventory slots during expeditions and ensures you always know how much food you have stockpiled. It’s the difference between panic-farming at 2 AM and having a sustainable supply chain.
Base Organization Benefits
A centralized storage system transforms how you play. Instead of wondering which chest holds your redstone, or whether those iron ingots are in the crafting room or the base, everything has a permanent address.
This becomes critical when you’re deep in creative mode building a massive project. You need to pull hundreds of specific blocks without wasting time navigating twelve different storage areas. A properly organized cheese cave reduces search time to seconds. Players often report that organizing their storage actually extends playtime, they spend less time looking and more time building.
Multiplayer survival gets exponential benefits. Teammates know exactly where to find communal resources, preventing duplicate storage of the same items and reducing disputes about resource hoarding.
Aesthetic Appeal And Design
Beyond function, a well-designed cheese cave becomes a showpiece. Modern Minecraft aesthetics treat storage as architecture, not an afterthought tucked in a side room.
You can theme your storage chamber, incorporate lighting design, decorative walls, themed block palettes that match your base’s architecture. Some players build underground markets complete with display cases and color-coded sections. Others construct vaulted chambers with arched ceilings and decorative pillars. When your storage actually looks intentional, your entire base feels more polished and lived-in.
This is where creative Minecraft ideas can really transform your project from functional to stunning. The cheese cave becomes a destination room rather than a utilitarian necessity.
How To Find The Perfect Location For Your Cheese Cave
Underground Positioning And Depth
Depth matters more than you’d think. Most experienced builders position their cheese caves between Y-level 0 and Y-level 20. This puts you below most natural cave systems, minimizing the chance that a stray mob wanders in, and it keeps you clear of surface-level structures.
Y-level 0 to -64 is optimal for post-1.18 worlds where the world extends deeper. If you’re on older versions (1.17 or earlier), aim for Y-level 5 to 15, deep enough to feel isolated but high enough to avoid bedrock complications.
Avoid positioning your cheese cave directly under your main base. Cave-ins shouldn’t happen if you build properly, but keeping your storage in a separate chamber means a catastrophic construction mistake doesn’t erase your entire inventory. Horizontal distance of at least 50 blocks between your base and cheese cave provides that safety margin.
Proximity To Your Base
You want your cheese cave accessible but not immediate. It should be reached by a dedicated staircase or nether portal route, not a casual walk from your front door. This distinction serves two purposes: it defines your storage as a special trip (you plan for it), and it protects your items if someone raids your surface base.
A properly routed tunneling system works perfectly. Dig a straight, torch-lit hallway from your main base down to the storage chamber level. Many builders add a checkpoint at the top, a small maintenance room or waypoint where you can stage items before moving them to permanent storage. This acts as a buffer and makes large transfers easier.
For nether routing: If you’ve got a developed nether highway system, consider a separate entrance to your cheese cave via the nether. This provides redundancy and speeds up access. Just ensure the connection is clearly marked and well-lit to prevent accidental portal placement errors.
Step-By-Step Guide To Building Your Cheese Cave
Gathering Materials And Tools
Before excavation, assemble your toolkit:
- Pickaxes: Bring at least two efficiency IV or V diamond pickaxes (or netherite if you’ve reached that stage). One pickaxe digs, the other is your spare.
- Shovels: An efficiency IV shovel for dirt and gravel accelerates the work significantly.
- Torches or candles: Bring stacks, you’ll place them constantly to prevent mob spawning and navigate.
- Food: Bring at least 64 of your best food. Sustained excavation drains hunger fast.
- Building blocks: Bring your chosen aesthetic blocks for walls and decoration (see the materials section below for recommendations).
- Scaffolding or stairs: Makes the excavation climb back up manageable without constant jumping.
Plan your chamber size before digging. A 30x30x15 chamber holds substantial storage without feeling excessive. For multiplayer servers, go bigger, 50x50x15 gives room for future growth.
Excavation And Chamber Design
Digging a large chamber efficiently requires strategy. Most builders use one of two approaches:
The slice method: Dig vertical slices through your chamber, working from top to bottom. This lets you manage falling blocks and creates a systematic work pattern.
The outline-then-fill method: Mark out your chamber perimeter with blocks, then hollow out the interior section by section. This prevents accidentally digging beyond your intended boundaries.
Once you’ve cleared the space, create an arched or vaulted ceiling rather than a flat top. Besides looking better, it distributes structural stress more naturally (even though bedrock doesn’t technically break). Plan your ceiling height at 4-5 blocks minimum to avoid feeling cramped when navigating the chamber with full inventory.
Add walkways and structural pillars if your chamber exceeds 20×20. These serve both aesthetic and practical purposes, they break up the visual monotony and provide navigation landmarks when you’re searching for a specific storage area.
Storage Block Setup And Organization
Decide your organizational system before placing blocks. Most players use one of these approaches:
By resource type: All ores together, all food together, all building materials together, etc.
By rarity: Valuable/rare items in one section, common materials in another.
By activity: Mining supplies, farming supplies, redstone components, decoration blocks each get their own zone.
By project: If running multiple builds, each gets a dedicated storage section.
Chests and barrels hold 27 and 1 slot respectively (barrels are worse for storage), so shulker boxes are superior when possible, they hold 27 stacks of items and can be carried. Arrange them in organized stacks, color-coded by type or arranged in rainbow order (a common aesthetic choice).
Label everything. Use item frames with the actual item floating inside, or place signs above storage sections. This prevents the annoying moment of opening 15 chests before finding your diamonds.
Lighting And Ventilation
Mobs won’t spawn on most light sources, but proper lighting makes your cheese cave functional and pleasant. Use a consistent light source throughout, lanterns, soul lanterns, and glowstone are popular choices. Aim for light level 12 or higher everywhere to prevent cave spiders and other hostile mobs from spawning in dark corners.
Ventilation isn’t strictly necessary (this is a tiny enclosed space, not a medieval castle), but many builders add aesthetic vents or air shafts to the ceiling for immersion. It doesn’t affect game mechanics but reinforces the feeling of this being a genuine storage facility rather than a rectangular box.
Consider ambient lighting. Lanterns placed in alcoves every few blocks create atmospheric lighting without overwhelming the space. Some builders install entire ceiling grids of recessed lights. The key is even distribution, no dark corners where shadows pool.
Best Blocks And Materials For Your Cheese Cave
Aesthetic Block Choices
Your walls set the tone. Popular choices include:
- Deepslate blocks (1.17+): Dark, sleek, and thematically appropriate for underground. Deepslate bricks look especially polished.
- Blackstone: Slightly warmer than deepslate, works well in nether-themed builds.
- Diorite/Andesite/Granite: For a more natural, mining-focused aesthetic. Mix them for textured walls.
- Polished blocks: Polished deepslate, polished blackstone, polished diorite, these look intentional and refined.
- Copper and copper-variants: Post-1.17 copper blocks oxidize gradually, creating beautiful patina effects over time.
Most cheese caves work with a two-block wall system: an inner decorative layer and an outer structural layer. This lets you replace the decorative blocks without rebuilding if you want to refresh the design.
Floor materials prevent monotony. Mix your wall block with a complementary material, if walls are deepslate, try deepslate tiles or even polished blackstone for contrast. Ensure the floor has clear definition so navigation feels intentional.
Functional Storage Solutions
Shulker boxes are endgame storage. They stack, they’re portable, and they hold full stacks. If you’re serious about organization, convert all your storage to color-coded shulker boxes. Use dye to name them in anvils, “Redstone Shulkers” or “Ore Storage” labels help teammates and prevent hunting for the right container.
Chests and barrels work for bulk storage when shulker boxes aren’t available. Double chests hold 54 items, making them efficient for abundant materials like dirt, sand, or wood. Barrels are single-slot containers, so they’re terrible for item storage but excellent for aesthetic decoration when you want something other than a chest’s appearance.
Hoppers organize automatically if you pair them with item sorters (covered in the advanced section). Even without automation, hoppers guide items visually, chain them together as decorative funnels leading into storage areas.
Item frames and armor stands display showcase items without taking inventory slots. Popular for displaying rare drops, first finds, or trophy items.
Advanced Cheese Cave Features And Upgrades
Automatic Sorting Systems
Once your basic cheese cave is functional, automatic sorting transforms it from storage into a logistics hub. Items you dump into a central hopper automatically route to their designated storage areas.
Simple sorters work with a hopper feeding into a comparator that detects item presence, triggering redstone to switch a hopper to the correct output line. Complex 32×32 sorting systems exist for servers with truly massive item flows, but most players find a 10-15 item automatic sorter satisfactory.
The advantage: Walk up to your sorter, dump your mining haul, and walk away. Items distribute themselves. This is particularly valuable on servers where time investment varies, automated sorting keeps the base efficient regardless of when players contribute items.
Building these requires basic redstone knowledge (comparators, repeaters, dust), but guides exist for specific designs. Many builders consult Twinfinite’s game guides when they need walkthroughs for complex automation systems.
Hopper And Redstone Integration
Beyond sorting, redstone integration enables practical features. Hoppers connected to your storage can pull items out on demand via redstone signals. Hook this to a button system and you’ve got a manual item distribution network.
More advanced: Clock circuits power hoppers in rotating patterns, cycling through your storage and displaying inventory without physically opening chests. Install observers on your storage chests and wire them to a display system, your visible chest inventory updates in real-time.
Villager trading halls often connect to cheese caves via hopper systems. Drops from your farm flow directly into storage, eliminating the tedious process of manually moving items. On multiplayer servers, this infrastructure becomes the backbone of shared logistics.
Display Cases And Showcase Areas
Dedicate a section of your cheese cave to displaying trophy items and first finds. Use item frames, armor stands with equipment, and specific lighting to create gallery-like presentation.
Many players build a “trophy room” where first diamonds, unique drops, and accomplished crafts live behind glass or in special display cases. This separates sentiment from storage, practical items stay organized, meaningful items get ceremonial presentation.
Use lighting strategically. Spotlights from above or ambient color-coded lighting (colored lights for different item categories) make your display area feel intentional. This is where your cheese cave transcends pure function and becomes a reflection of your playstyle and achievements.
Common Mistakes To Avoid When Building A Cheese Cave
Oversizing without planning: Building a massive chamber and not knowing how to organize it wastes space and creates a confusing maze. Sketch your layout before excavation.
Poor lighting placement: Dark corners breed ambiguous shadows and potential mob spawning. Err on the side of too much light, it’s easier to dim later than navigate darkness.
No redundancy: If your sole entrance collapses or gets blocked, you’re locked out of your storage. Build a secondary access route, even if it’s slower. A nether portal or separate staircase provides backup.
Mixing organization systems mid-build: Decide your sorting logic before placing storage blocks. Switching from “by rarity” to “by function” halfway through frustrates future you.
Ignoring fire spread: Magma blocks and certain decorative choices can burn. Ensure flammable materials aren’t adjacent to potential fire hazards. Deepslate is fireproof but wood isn’t.
Forgetting scalability: Build with growth in mind. If you add new features (sorting systems, display cases, trading halls), can your chamber accommodate new walkways and infrastructure? A cramped cheese cave becomes unusable as your world evolves.
Using the wrong pickaxe: Stone pickaxes can’t mine ores, leading to wasted time and broken tools. Diamond or netherite pickaxes are mandatory for serious excavation. Some players use Nexus Mods for mining speed enhancements if they’re in modded environments.
No material buffer: Always keep extra building blocks in nearby storage. Running out mid-decoration forces multiple supply runs.
Conclusion
A cheese cave transforms Minecraft from a game where you’re constantly hunting through chests to one where you’re actually playing. It’s the infrastructure that lets you focus on building, farming, and exploring instead of logistics management.
Start small if you’re new to the concept, build a 20×20 chamber, organize one item type per section, and scale up as you understand what works for your playstyle. Every world is different: what works for survival might not work for creative, and what works solo might feel wrong on a server.
The satisfaction of a perfectly organized cheese cave, with color-coded shulker boxes, automated sorting, and a trophy display of your best finds, justifies the initial excavation grind. Most players who build one realize they can’t play without one afterward. It’s one of those quality-of-life improvements that seems minor until you experience the alternative.
Dig deep, organize ruthlessly, and build something that makes sense for how you play. The perfect cheese cave is the one you’ll actually use.


