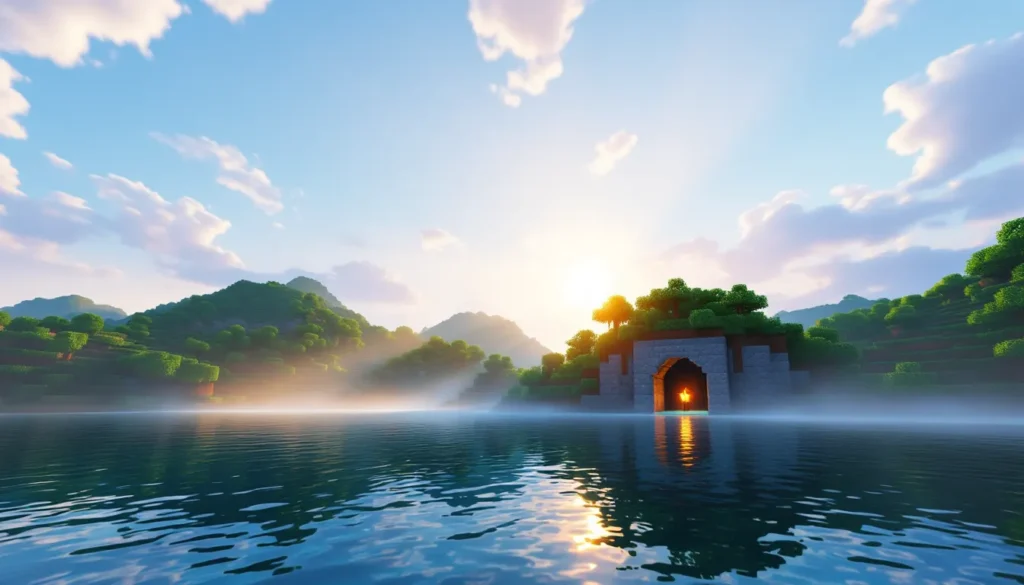

Minecraft’s blocky aesthetic has endured for over a decade, but what if those familiar cubic landscapes could look photorealistic? That’s where Iris shaders come in. Whether you’re exploring lush biomes that rival actual photography or diving into dimly lit caves with authentic shadow play, Iris transforms Minecraft’s vanilla visuals into something genuinely breathtaking. Since its launch, Iris has become the gold standard for shader modding on Minecraft Java Edition, offering unprecedented performance and compatibility compared to legacy solutions. This guide covers everything you need to know, from understanding what shaders actually do, to installation, troubleshooting, and extracting maximum visual fidelity from your hardware.
Table of Contents
ToggleKey Takeaways
- Iris shaders transform Minecraft’s flat lighting into photorealistic visuals with dynamic shadows, reflective water, and atmospheric effects by manipulating the GPU rendering pipeline in real-time.
- Iris is the gold standard shader loader for Minecraft Java Edition, offering superior performance and compatibility compared to legacy solutions like OptiFine through its lightweight, open-source Fabric-based design.
- Iris is highly scalable across hardware tiers—from RTX 3060 at 1080p to RTX 4080+ at 4K—with granular shader settings letting you balance visual fidelity against frame rates for your system.
- Installation requires only Fabric Loader, Fabric API, and the Iris JAR file placed in your mods folder, with shader packs added as ZIP files to your shaderpacks folder for quick in-game activation.
- Popular shader packs like Complementary deliver balanced realism and performance, while specialized options like BSL or AstraLex cater to cinematic quality or creative aesthetics without sacrificing Iris’s efficiency.
- Pairing Iris with Sodium (Fabric’s rendering optimizer) creates an unbeatable combination that both accelerates vanilla performance and enables visually stunning shaders for modern Minecraft gameplay.
What Are Iris Shaders and Why They Matter
Understanding Shader Technology in Minecraft
Shaders are specialized programs that manipulate how Minecraft renders light, shadow, water, and other visual elements. Unlike texture packs, which simply swap out block skins, shaders rewrite the rendering pipeline itself. They calculate complex lighting models, reflections, and atmospheric effects in real-time, think of them as GPU-accelerated cinematography for your game world.
Without shaders, Minecraft uses a flat, uniform lighting model. With them, sunlight casts directional shadows, water reflects the sky, and caves feel genuinely dark. Iris specifically acts as a shader loader, essentially a bridge between Minecraft and shader packs that makes them run efficiently.
The Evolution of Iris: From Inception to Modern Day
Iris didn’t emerge in a vacuum. For years, OptiFine held a near-monopoly on Minecraft shader support, but its development stalled and performance plateaued. When the Fabric modding community began reimagining Minecraft’s graphics pipeline, Iris rose as a lightweight, open-source alternative built specifically for the modern modding ecosystem.
Launched around 2021, Iris has matured significantly. The project benefits from constant optimization and community feedback, resulting in better frame rates and broader shader compatibility. As of 2026, Iris is compatible with Minecraft Java Edition versions ranging from 1.17 through the latest snapshots, with regular updates tied to major game releases. Its development reflects a shift toward community-driven graphics innovation rather than reliance on a single closed-source mod.
Key Features and Visual Improvements
Realistic Lighting and Shadows
Iris shaders carry out shadow mapping, a technique where light sources (sun, moon, torches) cast volumetric shadows across the landscape. Instead of everything being equally lit, surfaces facing away from light are genuinely darker. This alone adds enormous depth to familiar terrain.
Directional lighting changes throughout the day-night cycle. Sunrise and sunset create warm, low-angle shadows that stretch across your world. Noon light is harsh and intense. Night, if you’re deep in a cave or under dense foliage, becomes authentically pitch-black unless you carry a torch. This dynamic range makes exploration feel more immersive and survival more visceral.
Water and Weather Effects
Water rendering sees the most dramatic overhaul. Iris-enabled shaders make water reflective, showing clouds and the sky mirrored on the surface. Underwater, visibility gradually fades into murky blue depths. Rain and snow aren’t just texture overlays, they interact with lighting, creating wet surfaces that shimmer and glow.
Weather effects like fog density shift based on biome and time of day. Thunderstorms darken the sky overhead while lightning illuminates the landscape in sharp, sudden flashes. Standing in a desert during a sandstorm or watching snow fall in a taiga becomes genuinely atmospheric.
Bloom, Ambient Occlusion, and Custom Textures
Bloom is the glow effect where bright light sources bleed slightly into their surroundings, lava radiates warmth, torches emit halos, and the sun bleeds color at horizon. Ambient occlusion darkens crevices and corners where surfaces meet, adding micro-level detail even to plain stone blocks.
Iris works seamlessly with custom texture packs and high-resolution resource packs. A 64x or 128x texture pack paired with Iris shaders can make Minecraft look almost AAA-quality in screenshots. The combination of detailed textures and sophisticated lighting creates visual coherence that vanilla Minecraft simply cannot achieve.
System Requirements and Performance Optimization
Hardware Recommendations for Smooth Gameplay
Iris is surprisingly scalable, running anywhere from modest gaming laptops to high-end workstations, but expectations differ dramatically by hardware tier.
Entry-Level (60+ FPS): An RTX 3060 or RX 6600 with 16GB RAM handles medium shader packs at 1080p. Budget setups with GTX 1650 or equivalent can manage lightweight shaders but expect drops below 60 FPS in complex scenes.
Mid-Range (100+ FPS): An RTX 3070 or RX 6700 XT maintains high frame rates with high-quality shaders at 1440p. 32GB RAM is comfortable: 16GB works but leaves less headroom for other applications.
High-End (120+ FPS): RTX 4080 and above, paired with 32GB+ RAM, run demanding shader packs at 4K or ultrawide resolutions without compromise.
Importantly, Iris is CPU-efficient compared to OptiFine. A solid six-core processor (Ryzen 5, i5) is sufficient: GPU matters far more. SSD storage helps, but Iris doesn’t demand it, load times are already instant compared to vanilla.
Balancing Graphics Quality with Frame Rates
Iris provides granular control over shader settings. Most shader packs let you disable expensive effects like shadow distance, ray-traced reflections, or volumetric lighting independently. Aggressive users can reduce render distance, disable complex water reflections, or switch to lower-resolution shadows to squeeze higher FPS.
The sweet spot for most gamers is maintaining 60 FPS at gameplay-friendly settings. Competitive Minecraft pvpers prioritize frames over visuals, often disabling bloom and shadows entirely for maximum performance. Creative or exploration-focused players accept 40-50 FPS if it means visual fidelity.
VSync locks your frame rate to your monitor’s refresh rate (usually 60Hz), preventing screen tearing but adding latency. Turning it off lets Iris render as fast as possible, though screen tearing may appear. Most gamers find the visual smoothness of 60+ FPS more important than ultra-low latency in Minecraft.
Installation and Setup Guide
Installing Iris and Required Dependencies
Iris requires a few prerequisites:
-
Fabric Loader: Download the latest Fabric installer for your Minecraft version from the official Fabric website. Run it and select “Install Client.” This creates a Fabric profile in your launcher.
-
Fabric API: This library provides tools Iris depends on. Download the Fabric API JAR matching your Minecraft version and drop it into the
modsfolder (created after launching Fabric once). -
Iris Itself: Grab the latest Iris JAR from Nexus Mods or CurseForge (search “Iris Shaders”). Place it in the
modsfolder. -
Launch: Start Minecraft using the Fabric profile. Iris loads silently: you’ll know it works when the main menu appears and shader options are available.
If any mods conflict, say, a camera mod or another rendering mod, Iris will either crash or produce strange visual artifacts. Test with Iris + Fabric API alone first, then add other mods gradually.
Choosing and Installing Shader Packs
Shader packs are ZIP files, not executable installers. You’ll find them on modding sites, though formats vary slightly.
Installation:
- Create a
shaderpacksfolder in your.minecraftdirectory if it doesn’t exist. - Download your chosen shader pack ZIP, do not extract it.
- Place the ZIP directly in the
shaderpacksfolder. - In-game, open Settings → Video Settings → Shader Packs. You’ll see your shader listed.
- Click it to activate. Minecraft recompiles shaders for your GPU (takes 10-30 seconds).
- Adjust shader settings (optional) by clicking “Shader Pack Settings” in the same menu.
Don’t delete the ZIP file after installation: Iris reads from it. If a shader crashes on load, check your Java version (Iris needs Java 8 or higher) and GPU drivers.
Popular Shader Packs Compatible with Iris
Top-Rated Packs for Realism and Performance
Complementary Shaders remains the gold standard for balanced realism and performance. It delivers convincing shadows, realistic water, and bloom without demanding top-tier hardware. A 1080p system hitting 60 FPS with Complementary on high settings is the baseline expectation.
BSL Shaders is tuned for beauty. It prioritizes visual fidelity over frame rates, featuring advanced ray-tracing effects, depth-of-field, and cinematic lighting. Expect 30-50 FPS on high-end systems: it’s perfect for screenshots and exploration, less suitable for combat.
Continuum 3.1 takes the opposite approach, lightweight and fast. It’s ideal for older GPUs or if you’re playing on a Steam Deck. You’ll still get good lighting and water effects without the performance cliff of heavier packs.
Rethinking Voxels (RTV) sits in the middle, offering realistic lighting with acceptable frame rates on mid-range hardware. Its handling of translucent blocks (leaves, ice) is particularly refined.
Niche Shaders for Creative and Fantasy Aesthetics
Not every shader chases photorealism. Chocapic’s Shaders combines realism with a stylized color grading that leans warm and slightly desaturated, perfect for calm, meditative builds. Sora Shaders adds anime-like post-processing, making Minecraft feel like Studio Ghibli designed it.
AstraLex emphasizes vibrant, otherworldly colors, think neon glows and exaggerated contrast. It’s terrible for “realistic” gameplay but stunning for creative mode builds in surreal settings. Syntax Shaders provides a middle ground with fantasy-tinged lighting that feels magical without abandoning realism entirely.
The variety here is vast. Community shader recommendations on modding forums and video showcases help identify packs matching your aesthetic vision.
Troubleshooting Common Issues
Crashes, Lag, and Compatibility Problems
Black screen on load: Usually means the shader failed to compile for your GPU. Check that drivers are up-to-date (NVIDIA/AMD provide frequent updates). If using an integrated GPU, some complex shaders simply won’t work, switch to a lightweight pack like Continuum or BSL Low.
Lagspikes or stuttering: Often caused by shader recompilation mid-gameplay, especially if you alt-tab or if background processes interrupt GPU focus. Turning down render distance or disabling volumetric lighting alleviates this. If it’s persistent, your GPU might be thermal-throttling: check temperatures with tools like HWiNFO.
Crashes with other mods: Iris can conflict with mods that also manipulate rendering. OptiFine and Sodium are direct incompatibilities (don’t install both). Mods like JourneyMap can cause shader issues: try disabling them temporarily to isolate the problem. Post detailed crash logs in gaming community forums if standard troubleshooting fails.
Graphics Glitches and Performance Bottlenecks
Flickering textures or missing shadows: Usually a driver bug or shader incompatibility. Update your GPU drivers first. If it persists, the shader pack itself might have issues: try a different one or an older version of the same pack.
Water looking broken or invisible: Some shaders have toggles for water rendering. Check shader settings, disable and re-enable water effects. If that doesn’t work, your GPU might lack support for the shader’s water technique: try a different pack.
FPS drops in specific locations: Caves or terrain with heavy shadow overlap can cause frame rate dips. Reduce shadow distance or complexity in shader settings. Build visibility (how far Minecraft renders blocks) also impacts performance: reducing it from 32 chunks to 24 helps significantly.
Severe overheating: Iris pushes GPUs hard. Ensure case fans are clean, monitor temperatures, and consider underclocking your GPU if it consistently hits 90°C+. Thermal pads or repasting can help, but sometimes reducing shader quality is the only real solution.
Iris vs. Other Shader Loaders and Mods
Comparing Iris with OptiFine and Sodium
Iris is the lightweight, performance-focused choice. It’s built for Fabric and prioritizes compatibility with modern mods. Shader compilation is fast, frame rates are competitive, and development is active. Its main limitation is Fabric-only availability: if you’re using Forge, Iris isn’t an option.
OptiFine is the veteran. It’s been around longer, supports more Minecraft versions, and works with Forge. But, it’s closed-source, development is slow, and it’s frequently incompatible with other mods. Performance improvements are real but not revolutionary. For players comfortable with its ecosystem, OptiFine remains viable: for new players, Iris is the stronger choice.
Sodium isn’t a shader loader, it’s a rendering optimization mod that improves vanilla performance without shaders. Many players use Sodium + Iris together: Sodium makes Minecraft run faster, and Iris adds visual fidelity on top. This combo is the Fabric recommendation, offering both speed and beauty. Sodium alone doesn’t enable shaders: you need Iris for that.
The verdict: If you’re building a fresh Fabric setup on Java Edition, Iris + Sodium is unbeatable. If you’re already invested in OptiFine or Forge, switching isn’t mandatory, but Iris will give you better performance and fewer headaches as Minecraft evolves.
Tips and Tricks for Getting the Most Out of Iris
Customizing Shader Settings for Your Setup
Most shader packs expose dozens of toggles and sliders. Don’t get overwhelmed, focus on the big-impact settings first:
- Shadow Distance: Controls how far shadows are rendered. Reducing it from 64 to 32 chunks halves shadow-rendering load. Nearby shadows remain sharp: distant terrain isn’t shadowed, but most players won’t notice.
- Volumetric Lighting: The god-rays effect through clouds and foliage. Beautiful but expensive. Disabling it gains 10-20 FPS with minimal visual downside.
- Water Reflections: Full reflections are stunning but cost frames. Most packs offer “simple” or “screen-space” reflection modes that look 80% as good at half the cost.
- Bloom Strength: Subjective. Some love the glow: others find it washed-out. Dial it back if you prefer punchy colors.
- Ambient Occlusion: Subtle darkening in crevices. Disabling gains frames but makes surfaces feel flatter. Usually worth keeping on.
Experiment in creative mode or a flat world. Adjust one setting at a time, launch, and judge the FPS impact. Your perfect balance won’t match someone else’s setup.
Recording and Sharing Your Best Iris Moments
Iris screenshots and videos are genuinely impressive for sharing. Use F2 to take in-game screenshots (saved in your screenshots folder). For video, OBS Studio is the go-to free recorder.
Recording tips:
- Match your monitor’s refresh rate. If your monitor is 144Hz, capture at 144 FPS for smooth video. Match your actual in-game frame rate to avoid stuttering in playback.
- Use high bitrate. 50-100 Mbps for 1080p60 ensures quality: YouTube will re-encode it anyway, but starting with good source material matters.
- Stable positioning. Use a flying creative world to set up cinematic shots. Frame geometry to show off lighting and shadows.
- Post-processing: Minimal edits look best, perhaps a color grade for consistency, but avoid over-processing. Iris shaders already look polished.
- Platform choice: YouTube, Reddit r/Minecraft, and Twitter compress video heavily. Full-resolution uploads to personal storage or Discord preserve quality better.
Including shader name and settings in your post helps others replicate the look. Bonus engagement: many shaders have active communities eager to see what players create.
Conclusion
Iris shaders represent a maturation of Minecraft’s modding ecosystem. What was once possible only with OptiFine and countless workarounds is now accessible, performant, and future-proof with Iris. The visual transformation, from flat vanilla lighting to dramatic shadows, reflective water, and atmospheric effects, doesn’t require a state-of-the-art GPU or sacrificed frame rates.
Whether you’re chasing photorealism, exploring creative aesthetics, or simply curious about how GPU programming transforms a beloved game, Iris makes that journey straightforward. Installation takes minutes, shader packs abound, and troubleshooting is rarely necessary with current drivers and compatible mods.
The key takeaway: Iris isn’t a luxury for hardcore enthusiasts anymore. It’s the standard-bearer for Minecraft graphics in 2026. Try it, experiment with different shader packs, and find the balance of visuals and performance that works for your system. Your Minecraft world will thank you.


